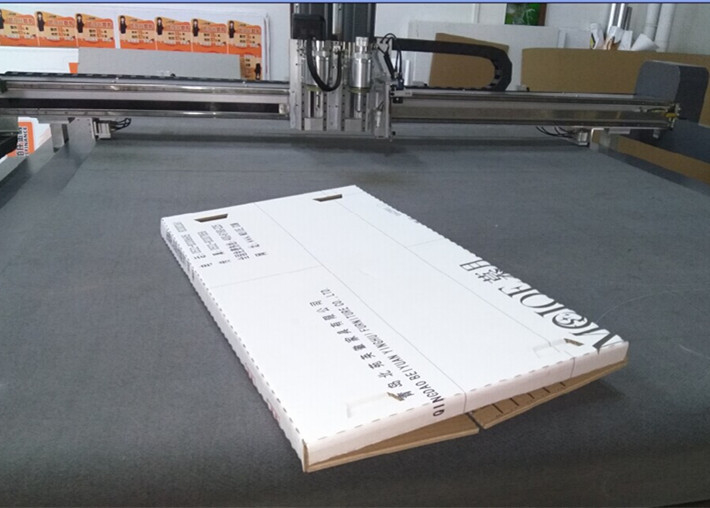
BOXMAKING
1) LAYOUT SHEET- loads a drawing representing a sheet of board.
a) Click the INSERT LAYOUT SHEET button.
b) Choose a sheet size and set origin to freehand.
c) Click the OK button and click a point to position the sheet.
d) Click the ZOOM ALL Button.
2) DATABASE – finds the book sizes so you can make the correct boxes
a) Go to Query (?) button
b) Click on REMOVE ALL button
c) In QUERY SETUP click lefthand drop down and find CONSTRUCTED
d) Next drop down, click on “=”
e) Next drop down type in “NO”
f) Click on ADD TO QUERY button
g) In QUERY SETUP click lefthand drop down and find MATERIAL
h) Next drop down, click on “=”
i) Next drop down type in “
j) Click on ADD TO QUERY
k) Click on RUN QUERY button
After this is done you should only have a list of 650 micron jobs that have not been made yet.
If you want 1000 micron jobs, repeat all steps but with “
If you want 1300 micron jobs, repeat all steps but with “
3) RUN INSERT PARAMETRIC - makes the current box to the correct size
a) In the database screen, click the RUN INSERT PARAMETRIC button.
b) Choose an appropriate style.
c) Click on screen to identify an origin.
4) SELECT and MOVE the box to a better part of the sheet.
a) If the box is not already selected, click on the SELECT tool
b) Drag around the box and let go to highlight it.
c) Click on the selected box and drag to the best area
d) Click on the ROTATE 90 button if you need to rotate the box to suit the grain direction
5) LOAD SYMBOL – puts the SHELFMARK on the spine of the box
a) Click the LOAD SYMBOL button
b) Drag the symbol to the appropriate location, use the symbol rotate Button if needed.
For the next box, repeat steps 2-5, until the sheet is full then
6) DELETE THE SHEET
a) Click on the red rectangle so that it is highlighted
b) press the DELETE key on the keyboard
7) PLOT the finished sheet
a) Click on the PLOT button.
b) In the plot screen make sure that the profile has been set to the correct sheet, (650,1000, 1300).
c) Check that the SINGLE LINESTYLE box has a mark in it.
d) Click the PLOT button.