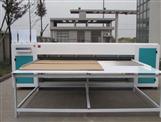
Create dimensional accents for scrapbook layouts, handmade greeting cards, kids' crafts and home decor projects by cutting chipboard shapes with a chipboard cutting machine[cutting machine?:CUTCNC sample maker cutting machine].
The manual machine uses dies---cartridges featuring a shaped, raised cutting edge that presses into the chipboard to slice through it---to create themed shapes, letters, numbers and border designs. Use the proper cutting tools and technique to ensure the chipboard cutting machine produces thick chipboard embellishments in detailed shapes with clean-cut edges.
Situate the chipboard cutting machine on a sturdy, solid surface so it won't tip over or rock as you turn the handle.
Place a clear "cutting pad" that comes with the chipboard cutting machine on your work surface. Choose a die featuring the desired shape and place it, cutting-edge up, on the cutting pad. Select a shape that coordinates with the theme of your craft project such as a set of candles if you're making a birthday card or your child's initial if you're making a decorative door hanger for her room.
Set the chipboard face-down on top of the die. If the chipboard doesn't feature a painted surface or decorative paper[paper?:paper sample maker cutting machine] on one side, it doesn't matter which side faces up or down.
Top the stack with a second clear chipboard cutting machine that also comes with the BIGkick machine.
Insert the stack in the slot along the bottom of the chipboard cutting machine. Hold the stack down lightly with the fingertips of one hand and turn the handle on the BIGkick with the other.
Remove the stack when it emerges from the other side of the machine. Lift off the top cutting pad and lift the chipboard off of the die. Run the tip of a craft knife around the edge of the chipboard shape if it doesn't immediately fall away from the chipboard sheet.